


We have all been there: you spend three hours tweaking a social media post, but it still looks like a high school flyer from 2005. It’s frustrating because you know what good looks like, but your mouse just won’t cooperate to make it happen.
In an era where your visual identity is often the first handshake you have with a customer, design quality isn’t just a “nice-to-have.” It’s your credibility. Whether you are building a personal brand or running a small business, your graphics tell a story about your attention to detail.
This is where Canva comes in. It has democratized design, making it possible for anyone to create. But there is a massive gap between “using Canva” and designing professionally. Most people use the templates as-is, leading to a cluttered, generic look. To stand out, you need a few “secret” techniques used by actual designers.
In this guide, we’re going to look at 10 specific Canva design tricks that will bridge that gap, turning your basic layouts into polished, high-end assets.
👉 If you are just getting started, you can also check out our complete Canva beginner guide to understand the basics before applying these design tricks.
Canva Beginner Guide 2026 — Step-by-Step Design Tutorial for Beginners
Table of Contents
- Establish a Consistent Color Palette
- Master the Rules of Font Pairing
- Utilize Grids and Precise Alignment
- The Power of Strategic White Space
- Sourcing and Editing High-Quality Imagery
- Mastering Transparency and Color Overlays
- The Foundation: Setting Up Your Brand Kit
- Smart Use of Icons and Geometric Shapes
- Creating Depth with Layering and Shadows
- Optimizing Export Settings for Maximum Quality
- Bonus: 3 Advanced Canva Pro Hacks
- Conclusion
- Frequently Asked Questions
1. Establish a Consistent Color Palette
One of the most common mistakes beginners make is using too many colors. When you use every color in the rainbow, the viewer’s eye doesn’t know where to land. Professional design relies on a restricted, intentional color story.
Why it works
Color psychology plays a huge role in how we perceive a brand. Blue conveys trust, red sparks urgency, and green suggests growth. Beyond psychology, a consistent palette creates visual harmony. It makes a series of posts feel like they belong to the same family, which builds brand recognition over time.
How to do it in Canva
- The 60-30-10 Rule: Choose one dominant color (60%), one secondary color (30%), and one accent color (10%) for your buttons or call-to-actions.
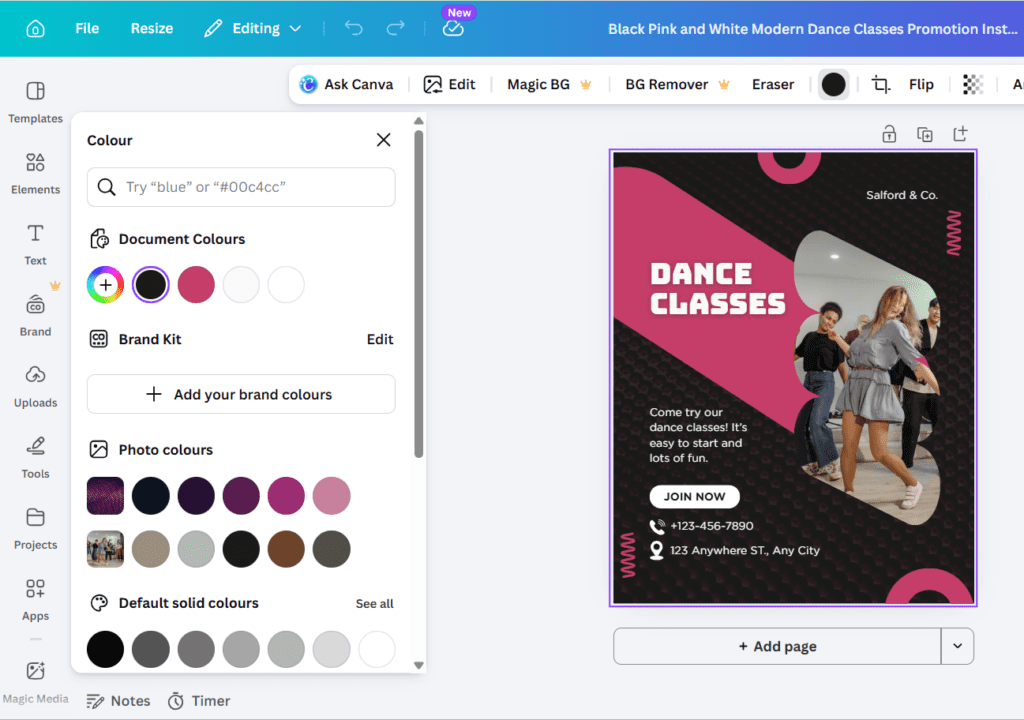
- Photo Color Extractor: If you have a beautiful image, click on a color picker in Canva, and it will automatically show you the “Photo Colors.” Use these to make your text match your imagery perfectly.
- Style Tab: Open the “Styles” tab on the left sidebar to find curated color combinations if you aren’t ready to build your own from scratch.
Real-Life Example
Imagine an Instagram carousel for a skincare brand. By using a palette of soft beige, muted sage green, and white, the entire feed feels “clean” and “organic.” If they suddenly threw in a bright neon yellow “Buy Now” button, it would shatter that premium feel.
Common Mistakes to Avoid
- Vibrating Colors: Putting bright red text on a bright blue background. This literally hurts the eyes.
- Too much black: Instead of pure black (#000000), try a very dark navy or charcoal for a more sophisticated look.
2. Master the Rules of Font Pairing
Typography is the “voice” of your design. If your fonts are clashing, it’s like two people shouting different things at the same time.
Why it works
Good font pairing creates a visual hierarchy. It tells the reader, “Look at this big bold text first, then read this smaller text for details.” It establishes a rhythm that makes your content easy to digest.
How to do it in Canva
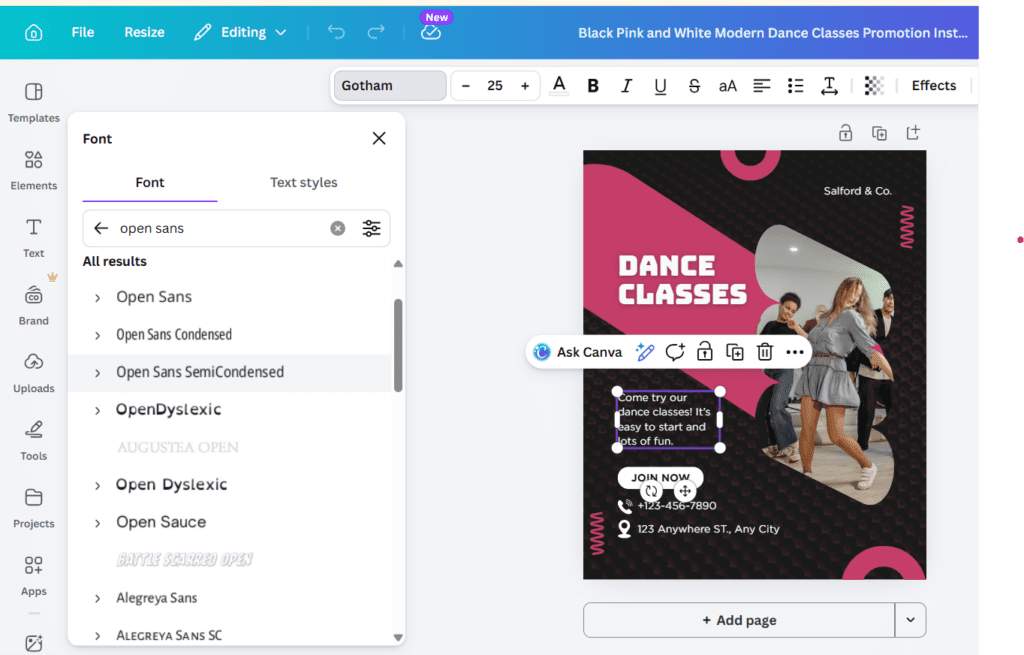
- Pair a Serif with a Sans Serif: This is the golden rule. Serifs (fonts with little feet, like Playfair Display) feel classic and elegant. Sans Serifs (clean fonts like Montserrat) feel modern and tech-forward. Combining them creates a beautiful balance.
- Limit to Two Fonts: Using three or more fonts usually looks messy. Stick to one for headings and one for body text.
- Use Font Styles: Instead of picking a new font, use the “Bold” or “Italic” versions of the same font family to create contrast.
Real-Life Example
A high-end webinar slide deck might use Libre Baskerville (Serif) for the titles to show authority and Lato (Sans Serif) for the bullet points to ensure readability on mobile screens.
Common Mistakes to Avoid
- Overusing “Script” fonts: Cursive fonts are great for accents but terrible for long paragraphs.
- Bad Kerning: If your letters are too squashed together, they become unreadable. Use the “Spacing” tool to give them room to breathe.
Try Canva for free to experiment with their massive library of professional font pairings.
3. Utilize Grids and Precise Alignment
Nothing screams “amateur” louder than elements that are just slightly off-center. Human brains are wired to look for patterns and symmetry.
Why it works
Alignment creates a sense of order and stability. When things are aligned, the design feels intentional. It guides the reader’s eye through the page in a logical flow.
How to do it in Canva
- Turn on Rulers and Guides: Go to File > View Settings > Show Rulers and Guides. This allows you to drag lines across your canvas to ensure everything sits on the same horizontal or vertical plane.
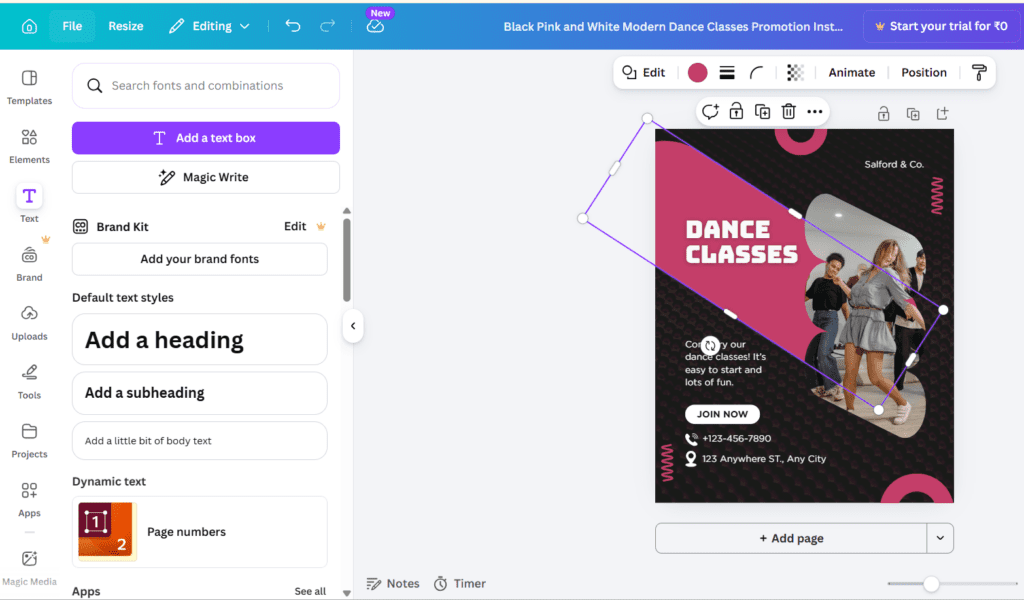
- The “Tidy Up” Tool: Select multiple elements, click “Position,” and then “Tidy Up.” Canva will instantly space them evenly and align them perfectly.
- Use Grids for Layouts: From the “Elements” tab, search for “Grids.” Drop a grid onto your canvas before you start adding photos to ensure your proportions are mathematically correct.
Real-Life Example
A Pinterest pin with three different photos. Without a grid, the gaps between the photos might be uneven. Using a 3-cell grid ensures the spacing (the “gutter”) is exactly the same between every image, making it look like a professional magazine layout.
Common Mistakes to Avoid
- Eyeballing it: Never assume something is centered. Always use the “Position” menu to verify.
- Ignoring Margins: Don’t put important text too close to the edge of the canvas. Leave a “safe zone” all the way around.
4. The Power of Strategic White Space
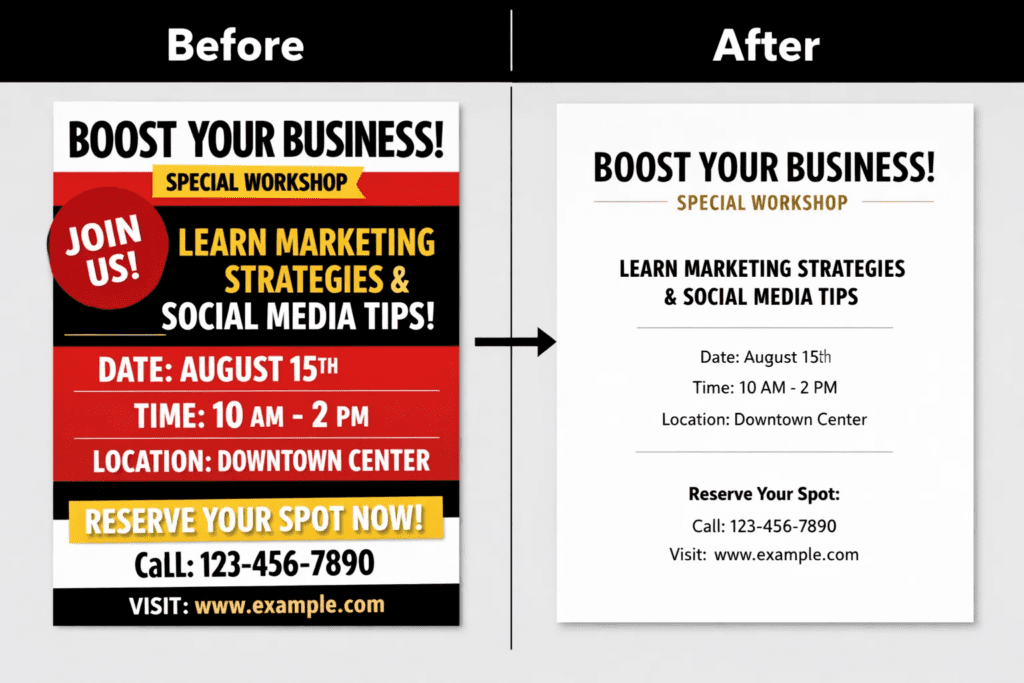
Beginners often feel the need to fill every square inch of a design. Professionals know that white space (or negative space) is actually a design element in itself.
Why it works
White space allows the eye to rest. It acts as a “buffer” that prevents your design from feeling overwhelming. In high-end branding (think Apple or Chanel), white space is used extensively to signify luxury and importance.
How to do it in Canva
- Group and Separate: Group related items together and leave a large gap between that group and the next one.
- Simplify the Message: If you have too much text, move some of it to a second page. Less is almost always more.
- Padding: Ensure there is plenty of space inside your buttons and around your text boxes.
Real-Life Example
A Facebook ad for a coaching program. Instead of listing 15 benefits in tiny font, a professional design might feature one powerful headline, a photo, and a lot of empty space around the “Sign Up” button. This makes the button pop and increases click-through rates.
Common Mistakes to Avoid
- Crowding the edges: Placing text right up against the border of the image.
- Fear of “Empty” space: Don’t feel the need to add icons or shapes just because an area looks empty. Let it breathe.
5. Sourcing and Editing High-Quality Imagery
You can have the best layout in the world, but if the photo is blurry or “stocky” looking, the whole design fails.
Why it works
High-quality images evoke emotion and build trust. Authentic, crisp imagery makes your brand feel “real” and professional.
How to do it in Canva
- Search for “Aesthetic”: When looking for photos in the “Elements” tab, add keywords like “minimal,” “candid,” or “authentic” to avoid the cheesy “business people shaking hands” look.
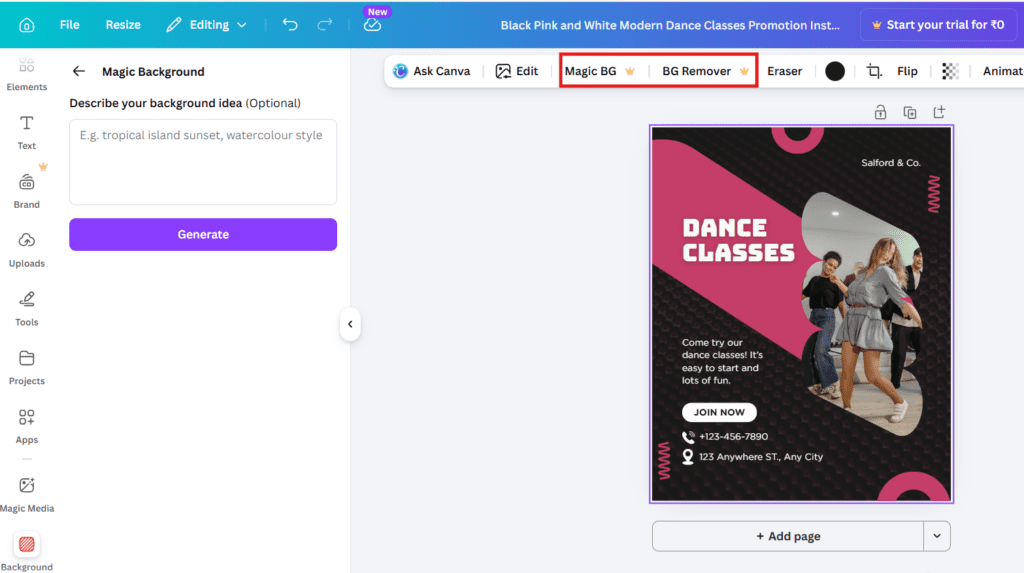
- Background Remover: Use the “Edit Image > Background Remover” tool to cut out subjects. This allows you to place them on custom brand colors, which looks much more professional than a standard rectangular photo.
- Apply Consistent Filters: To make photos from different sources look like they belong together, apply the same “Filter” or “Adjustment” settings (like slightly boosting the brightness and lowering the saturation) to all of them.
Real-Life Example
A YouTube thumbnail. Instead of a busy photo, a creator uses the background remover to cut themselves out, places a glowing outline around their body, and sets themselves against a high-contrast background. This makes the “character” of the thumbnail stand out immediately in a crowded feed.
Common Mistakes to Avoid
- Stretching Images: Never pull an image from the side handles (distorting the aspect ratio). Always pull from the corners.
- Low Resolution: Using images downloaded from Google that look pixelated when enlarged.
Create your first design here and explore the premium image library to see the difference quality makes.
6. Mastering Transparency and Color Overlays
Text can be hard to read when placed directly over a detailed photo. Transparency is the “cheat code” to fixing this while keeping the design stylish.
Why it works
It creates contrast. By placing a semi-transparent shape between your background and your text, you create a dedicated “reading zone” without completely hiding the beautiful image behind it.
How to do it in Canva
- The Shape Overlay: Place a square over your entire image, turn it black or a dark brand color, and drop the “Transparency” (the checkered icon) to about 30-50%. Place your white text on top.
- The Gradient Fade: Search for “Gradient” in elements. Choose one that fades from a solid color to transparency. This is perfect for when you want the top of an image to be clear but the bottom to be dark enough for a caption.
- Softening Background Elements: If an icon is too distracting, lower its transparency to 10% so it acts as a subtle watermark or texture rather than a focal point.
Real-Life Example
A quote post on Instagram. A vibrant sunset photo is used as the background, but it’s too “busy” for the text. By adding a 40% black overlay, the white text becomes incredibly easy to read, and the sunset still looks beautiful in the background.
Common Mistakes to Avoid
- Over-dimming: Making the overlay so dark that you can’t see the photo at all.
- Muddiness: Using a brown or gray overlay on a colorful photo can make it look “dirty.” Try using a dark version of one of the colors already in the photo.
7. The Foundation: Setting Up Your Brand Kit
If you want to move fast and maintain quality, you cannot be choosing colors and fonts every time you start a new project.
Why it works
Consistency is the hallmark of professional design. A Brand Kit ensures that every single thing you produce—from a 1-page PDF to a 50-slide presentation—looks like it came from the same company.
How to do it in Canva
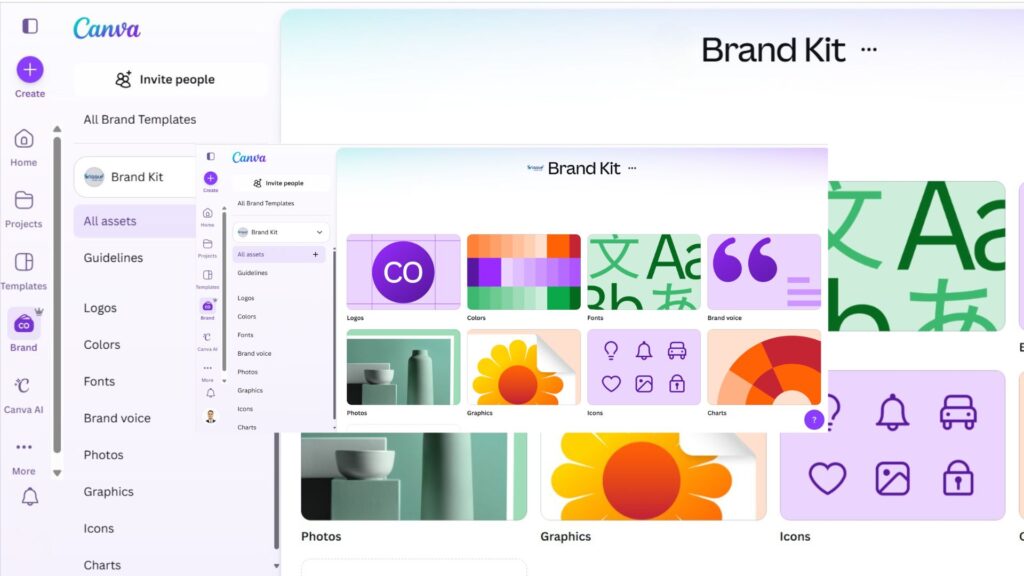
- Upload Your Logo: Store all versions of your logo (color, white, and black) in the Brand Kit section.
- Define Your Palette: Input your specific Hex codes (e.g., #FF5733) so you never have to “guess” the shade of orange again.
- Set Brand Fonts: Assign your Heading, Subheading, and Body fonts.
Real-Life Example
A virtual assistant creates social media graphics for three different clients. By switching between Brand Kits in Canva, she can instantly update the colors and fonts of a template to match the specific client’s identity in two clicks.
Common Mistakes to Avoid
- Font Drift: Using “Close enough” fonts because you forgot the name of your main one.
- Logo Distortion: Not having a PNG with a transparent background, leading to a white box around your logo on dark backgrounds.
Before you go further, start designing on Canva by setting up your basic Brand Kit to save hours of work later.
8. Smart Use of Icons and Shapes
Icons are great for breaking up text, but they can easily make a design look “clip-art-ish” if not handled with care.
Why it works
Shapes provide structure. They can be used to frame important information, create buttons, or add a sense of movement. Icons act as visual cues that help people scan your content faster.
How to do it in Canva
- Stick to One Style: Don’t mix “Line Icons” (thin outlines) with “Solid Icons” (filled in). Choose one style for the entire design.
- Use Frames: Instead of just dropping a square photo, use a “Frame” (like a circle or a window shape) to give the photo an interesting border.
- Subtle Borders: Sometimes a very thin border (1 or 2 px) around a text box is all you need to make it look “finished.”
Real-Life Example
An infographic about “5 Tips for Remote Work.” Using five icons that all have the same thickness and color makes the list feel curated and professional, rather than just a bunch of random images thrown together.
Common Mistakes to Avoid
- Too many styles: Mixing 3D icons with flat icons.
- Improper Scaling: Making icons so large they compete with the headline. They should be “supporting actors,” not the stars.
9. Creating Depth with Layering and Shadows
Flat designs can sometimes feel a bit “dead.” Adding a sense of depth makes a design feel tactile and high-end.
Why it works
Layering creates a 3D effect on a 2D screen. It mimics the real world, where objects cast shadows and overlap each other. This draws the viewer “into” the design.
How to do it in Canva
- Drop Shadows: Click on an image or text, go to “Edit Image” or “Text Effects,” and select “Shadow.” A subtle “Drop Shadow” or “Glow” can make an element pop off the page.
- The Overlap: Place a bit of text slightly behind a person’s head (using the “Position” layers) and then a bit of text in front. This “sandwiching” creates instant depth.
- Blurring Backgrounds: Take your background image and give it a slight blur (Edit Image > Adjust > Blur). This creates a “bokeh” effect that makes the foreground elements look sharp and professional.
Real-Life Example
A product feature post for a new sneaker. The sneaker is cut out from its background. A soft, blurred shadow is placed beneath it, and a large, semi-transparent letter sits behind the shoe. It looks like a page out of a fashion magazine.
Common Mistakes to Avoid
- Harsh Shadows: Shadows should be felt, not seen. If the shadow is too dark or has 100% opacity, it looks fake.
- Over-layering: Too many layers can make the text impossible to read. Always prioritize clarity.
10. Optimizing Export Settings for Maximum Quality
The most beautiful design in the world won’t matter if it looks blurry when you upload it to Instagram or print it for a trade show.
Why it works
Different platforms require different file types and sizes. Using the right settings ensures your colors stay true and your lines stay sharp.
How to do it in Canva
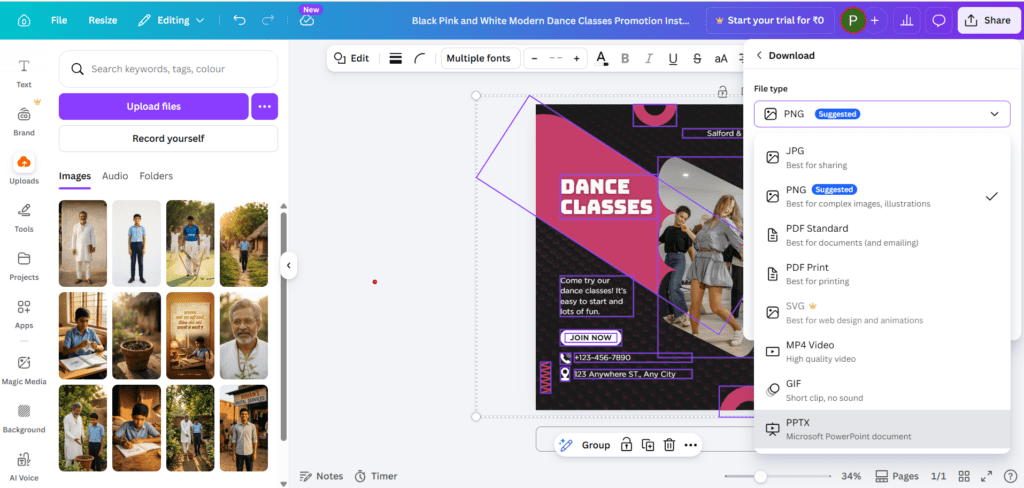
- PNG for Digital: Use PNG for social media. It handles text and flat colors much better than JPG.
- SVG for Logos: If you are exporting an icon or logo to be used elsewhere, export as an SVG (Scalable Vector Graphic) so it never loses quality regardless of size.
- PDF Print for Physical: If you are printing, choose “PDF Print” and check the box for “Crop marks and bleed.” This gives the printer the extra space they need to cut the paper without leaving white edges.
- Double the Size: For platforms like Twitter or LinkedIn that compress images, I often design at 2x the required size to ensure it stays crisp after the platform does its “crunching.”
Real-Life Example
A business card design. If you export it as a standard PDF, the colors might look dull when printed. By selecting “PDF Print” and ensuring the color space is correct, the final physical card will look exactly like it did on your screen.
Common Mistakes to Avoid
- Using JPG for text: This often leads to “artifacts” or fuzziness around the letters.
- Ignoring File Size: Don’t send a 25MB PNG for a simple email header; it will slow down the loading time.
Bonus: 3 Advanced Canva Pro Hacks
If you’ve mastered the basics, these three “Pro” tips will put you in the top 1% of Canva users.
1. The “Magic Morph” Tool
Located in the “Apps” section, Magic Morph allows you to take a boring shape or text and turn it into something textured—like shiny gold, inflated balloons, or carved wood—just by typing a prompt. It’s a great way to create custom “hero” elements.
2. Custom Shortcuts for Speed
Efficiency is a part of professionalism. Use these:
- ‘T’ – Instantly adds a text box.
- ‘R’ – Instantly adds a rectangle.
- ‘C’ – Instantly adds a circle.
- ‘L’ – Instantly adds a line.
- Cmd/Ctrl + Enter – Adds a new page.
3. Using “Sections” in Whiteboards
If you are brainstorming or creating a brand strategy, use the “Whiteboard” feature. You can group ideas into “Sections” and then instantly convert those sections into a presentation deck. It’s a massive time-saver for client work.
Conclusion
Creating professional designs in Canva isn’t about having a secret degree in fine arts; it’s about discipline. It’s about choosing a palette and sticking to it, respecting the white space, and making sure your elements are aligned to the pixel.
Most people fail because they try to do too much. They add too many filters, too many fonts, and too many icons. If you take away only one thing from these Canva design tricks, let it be this: Simplicity is the ultimate sophistication.
Start small. Pick one or two of these tricks and apply them to your next project. You’ll be surprised at how quickly your “DIY” look transforms into something that looks like it was produced by a high-end agency.
Ready to put these tips into practice? Start designing on Canva today and see the transformation for yourself.
FAQs
1. Is Canva Pro worth it for a beginner?
Yes, primarily for the Background Remover and the Brand Kit. These two features alone save enough time to justify the cost if you are creating content regularly. Plus, the access to premium stock photos prevents your designs from looking like everyone else’s.
2. How can I make my Canva designs not look like templates?
The best way is to change at least three major elements: the font, the color palette, and the imagery. If you keep the layout but change everything else, the “template” becomes a custom design.
3. Why do my colors look different when I print them?
Screens use RGB (Red, Green, Blue) light, while printers use CMYK (Cyan, Magenta, Yellow, Black) ink. When exporting for print, ensure you select the “PDF Print” option in Canva, which is optimized for physical production.
4. Can I use Canva for professional logo design?
Canva is great for conceptualizing logos, but professional designers usually prefer vector software (like Adobe Illustrator) because it allows for infinitely scalable designs. However, for 90% of small businesses, a Canva-designed logo exported as an SVG will work perfectly.
5. How do I keep my Canva account organized?
Use Folders. Create folders for specific clients, projects, or social media platforms. You can even create a “Starred” folder for elements you use constantly, like your headshot or specific icons.
6. Is it better to design on a phone or a computer?
While the Canva app is great for quick edits or social media stories, “real” design work is much easier on a desktop. The precision required for alignment and layering is much easier to achieve with a mouse and a large screen.
7. How do I find “aesthetic” elements in Canva?
Instead of searching for general terms like “flower,” search for “boho line art flower” or minimalist botanical. This filters out the dated-looking graphics and shows you more modern, trendy options.
0 Comments